How to Learn a Guitar Solo

guitarlessonskualalumpur

How to Learn a Guitar Solo

Have you been learning to play your electric guitar but haven’t tried to play a guitar solo yet?

It can be intimidating to learn your first guitar solo. There are a few things that you need to keep in mind. This guide will help you master that first solo and make it easier for you to memorize it for the future.

guitarlessonskualalumpur


Start with a Short and Simple Solo

You should start with a short guitar solo at first.

It’s easier to memorize just a few bars that it is to memorize a long, complicated solo. Some of the most famous solos of all time are quite short.

Here are some samples:

  • Intro solo to Wish You Were Here by Pink Floyd
  • Elvis – Heartbreak Hotel
  • Californication -Red Hot Chilli Peppers
  • Come Together – The Beatles
  • Nothing Else Matters – Metallica
  • Whole Lotta Love – Led Zeppelin

These are a few suggestions. Try a short solo of an artist that you like.


What to Do First

Before you try and learn the solo, listen to it several times. You want to get the feeling of the solo in your head. You want to recreate that feeling when you play it. Spend a lot of time just listening and try to pick out some of the notes. See if you can play a few of them on your electric guitar. Don’t look at any music when you do this. This is a good ear training exercise. See if you can figure out the “key” that the song is in.

Always play a solo slow at first. Work it up to speed as you master each section.


Break it Down

To learn a solo, you need to break it down bar by bar. Have a look at the music and each bar of the solo. Start with the first bar, and don’t play anything else until you have mastered that one bar. Once you have mastered the first bar add in the second bar. Continue doing this until you can connect all the bars together. Don’t worry about speed or timing here, get the notes of the solo under your fingers.


Look for Patterns

To help with memorization, look for patterns in the solo. For example, there may be one lick that is played several times during the solo. Many solos have patterns like this that you can pick out. In some cases, the lick may change a bit or move to another place on the fretboard. Watch for this sort of change in the guitar solo.

Think of a solo as a series of licks that you need to learn on your electric guitar. Each lick connects to the next one to make up the solo. Once you can see the licks and patterns in a solo, learning it is much easier.

Guitartuitionkl


What to Do if You Struggle with the Solo

Solo guitar is a lot harder than rhythm guitar. It’s easy to struggle at first. The key is to master small sections (each bar) of the solo before you try and play the whole thing. This is why you need to break down the solo, as discussed earlier. Examine the sections that give you trouble. Is it a certain bend? Fast lick? Try to isolate the section that is giving you problems and work on that part. Try to see how the other parts connect to the section giving you problems.


Play it with the Recording

Once you have the notes under your fingers. Play the recording and try the solo with the music. This is difficult the first few times you do it. The key is to keep practicing until you can play the solo with the recording and get the notes right.

If you struggle, try going through the motions of the solo without playing the notes. Put your fingers where the notes should be and play some air guitar to the solo on the record. See of you can then play the first couple of bars without making a mistake. Once you can do that, add in more bars.


It May Not Sound the Same as the Recording

Playing a guitar solo “exactly” like the recording is quite difficult. Don’t worry if it’s not quite the same. It takes a lot of practice to get a solo to sound like a recording does. Your own personality will come out in the solo that you play. For example, your vibrato may be a bit different than the guitarist that recorded the solo.


Conclusion

The whole idea of learning a guitar solo is to take your time. Break the solo down and work on it bar by bar. Master small section of the solo, then put it all together. Play along with the recording as much as possible. Get the solo as close to the actual recording as you can.


Learning to play the electric guitar can seem difficult at times, that’s why having a great electric guitar teacher to guide you is very important. In London, Electric Guitar Lessons, will be able to help you improve your guitar playing and your creativity.


Improvising In Different Keys With The Major Scale

guitarlessonsinkualalumpur

Improvising In Different Keys With The Major Scale

by Marco von Baumbach


Are you one of the people who have learned the major scale without being told how to use it to actually make music, or you can only use it in one specific key (probably C major)?


If that sounds familiar to you, than you might be very frustrated about not being able to do anything with it, especially considering all those cool backing tracks on youtube you might not be able to enjoy, because you simply don’t know how to play over them, or you are limited to those who are in C major.


But don’t worry, I am going to show you now how to play over any major key or minor key backing track with the major scale.


I know the basic major scale shape on the 8thfret, but how do I use it?


If you have ever learned to play a major scale up and down the 6 strings, you probably have learned this one:

guitarlessonsinkualalumpur

If You already know it, that’s great! If not, just take the time and memorize it. If you have learned it, or heard of it before, you might know that it is generally played beginning on the 8thfret on the low E-String, which is the note ‘C’.


The note which you are beginning the scale with, is determining in which key you are in. So when you are starting on the ‘C’ note on the 8thfret, you are playing in the key of C major.


That being said, you should know where the notes are on the low E-string, or at least be able to figure them out, because as said above, the note you are starting with is determining the key you are in.


So, how can I play the major scale over songs in different keys?


If you have understood everything that we have discussed before, you are ready to play the major scale in any key you want. As said before, the note which you are starting on is determining in which key you are in.


So let’s say you want to improvise over a song that is in G Major. All you need to do is to find out where the note ‘G’ is on the E-string (it is on the 3rdfret) and than you simply move the major scale shape (as it is in the picture above) and play it beginning on the 3rdfret of the E-string). You can do this with any major key.


Just keep in mind that the scale shape always stays the same. You move it as it is up and down the fretboard to the root note of the key you want to play in. This allows you to play in any major key you want!


What should I do if a song is in a minor key?


A lot of backing tracks on youtube are not in major keys, but in minor keys. If you have a song in a minor key, you can not play the major scale, by simply starting on the root note of the minor key. So, if you have a song in A minor do notplay the major scale beginning on the 5thfret (which is the note A). This will not sound good!


What you should do instead, is to start the major scale 3 frets higher than where the root note of the minor key is. So, if we stick to the example of A minor, you would not start the scale on the ‘A’ note, 5thfret, but you would count 3 frets upwardsto the 8thfret and start the scale from there.


Just try it out and you will find that it works. I’m not going to discuss the theory behind it for now, that’s not important for you to know at this point, just take it as it is and have fun experimenting.


My name is Marco von Baumbach, I’m a guitar teacher in Wuppertal, Germany. If you are from that area and are interested in lessons, check out my website aboutGitarrenunterricht in Wuppertal

How to Write Music When You Can’t Play an Instrument

guitar lessons in petaling jaya

How to Write Music When You Can’t Play an Instrument

By Chris Glyde

Obviously, not playing an instrument makes it a bit harder to write music, so if you can learn an instrument, I would suggest at least taking up basic piano. That being said, this article is going to operate under the premise that you’re not going to learn another instrument. How can you write songs with just a voice and your brain?


Singing each part with your voice:

The easiest thing to do would be to learn about counterpoint, which is the movement between individual notes—horizontal and vertical. Then you can sing melody lines and stack them together in order to write the music that you’re interested in writing.

I would also make sure that you spend time on ear training in order to develop proper aural skills.

One artist who sang all of the lines of his music when he was writing it was Michael Jackson. Now, did Michael Jackson spend time learning counterpoint and ear training? I don’t know the answer 100%, but my guess would be no. However, I’m sure that he developed a great ear for the proper melodic motions of the styles he wanted to portray from being in the studio so much as a child with the Jackson 5, and even when his solo career took off as well. The idea is that proper ear training and counterpoint knowledge can help you better understand what you’re doing, find patterns, and then repeat and/or break them when you desire to or when the song calls for something different.

best guitar lessons kuala lumpur

A lot of people would say that this skill is incredibly hard to develop. However, that’s not exactly true—it just takes time and patience. If you have the drive, you can learn it.

Just create a single vocal line:

I may be a tad bit biased as a vocalist, but melody to me is the part of the song that most quickly catches the ear. As such, there’s absolutely nothing wrong with a writer practicing melody writing. You can put that melody to words and then give it to the instrument section. Then, it’s their job to figure out how to accompany this melody (which chords to use, etc.). From that point, you can enter into discussions about form and use your bandmates’ knowledge in order to help you work out a really awesome song!

This seems to be a more common approach. Although, oftentimes it’s done the opposite way as well. In that method, the instrument section devises their parts first and then gives it to the singer to write lyrics and melodies. I find the “instrument section first” method easier, but that’s probably because I’ve done it more frequently.

If you were to write melodies first, it would push the songs in a different direction, because the process you would be using is different, which is creativity in a nutshell. I also find that if I write the instrument section first, it tends to limit what my melodies sound like. In that situation, I’m already stuck in a key, and I can’t experiment to the same extent. More interesting melodies are not a bad thing!


about the author:

If you’re looking for help developing the necessary skills to become a strong vocalist, then check in with Chris Glyde! He’ll help you develop your voice in Rochester.

3 Methods To Tune Your Guitar

guitar tuition

3 Methods To Tune Your Guitar

If you have started to play the guitar or are thinking of playing guitar, one of the most important things to do is make sure that your guitar is in tune. You will not be able to play the songs you like (and have it sound any good) if your guitar is out of tune. But if you have just started you may not know how to tune your guitar, if so read on.

I will share with you some methods you can use to tune your guitar.

Method 1: Get a tuner to tune your guitar

You need to go to a guitar store and buy a tuner and depending on the type of tuner you use, a guitar cable. To do this method you:

1) Buy a clip-on tuner or a regular tuner. If you get a regular tuner get a guitar cable as well

2) Attach the clip-on tuner to your guitar headstock (where the brand of the guitar is) or plug your guitar cable into the input jack of your guitar and plug the other side into the regular tuner.

3) Play the thickest string, this is the low E string.

4) Turn the tuning peg (on the headstock) that correspond to the low E string. To check which peg to turn, look at the string you are tuning and see where the string stops and you will find the tuning peg it stops at. This is different depending on the build of the guitar. IMPORTANT: Get this wrong and you will tune the wrong string and that string will be further out of tune!

5) The tuner will say what note the thickest string is, keep turning the tuning peg until the tuner says the string is E and that the tuner line (on the screen of the tuner) is in the middle. This is how you know it is in tune.

6) Repeat steps 3-5 with the other strings. The notes that the other strings should be tuned to are as follows.

e (thinnest)

B

G

D

A

E (thickest)- this is the one you have just done

This is the method I recommend beginners to use. I also suggest you get a good guitar teacher and they will show you how to do this at first.


Method 2: Tune the guitar to itself

This method is a little more advanced. It requires that you have some ear training skills. Here is how you do it

1) Tune the thickest string first (the low E string)

2) Play the 5thfret on the E string and tune the A string so it sounds exactly the same as the 5thfret on the low E string.

3) Play 5thfret on A and tune D to sound identical to that note

4) Play 5thfret on D and tune G string to sound identical to that note

5) Play the 4thfret on the G string and tune the B string to sound identical to that note.

6) Play the 5thfret on the B string and tune the high e string to sound identical to that note.

Be careful here though, this will test your ears and if you get one string wrong the guitar will not be in tune. You can use the tuner to check if you did it right if you need to.


Method 3: Tune purely by ear

Unless you are at least at mid-late intermediate level or higher, do not attempt this method. But assuming you are advanced enough, this will help improve your ears which will improve your skills as a musician.


Well that is how you tune your guitar, and to get to playing some songs on the guitar make sure you find the right guitar teacher.


About the author: Jake Willmot likes to chill and play guitar on Monday nights. If you are looking for Devon guitar lessons then give Jake Willmot a call!

Organise Your Fretboard Knowledge To Play Any Song

guitar tuition in pj

Organize your fretboard knowledge to play any song

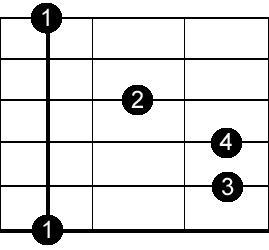
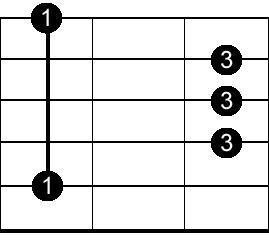
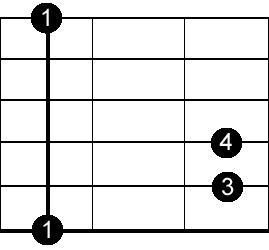
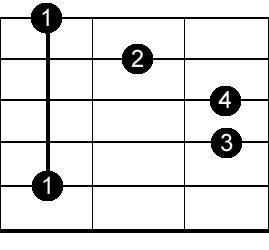
Let‘s assume that you have left the beginner stage of playing guitar and know the most common bar chord shapes for major and minor. There are a lot of articles about those shapes so I will brush over these and show them below. What comes next is to organize your fretboard knowledge and orient yourself so that you can play any typical song that you hear with ease. This article will show you how you can develop this skill in no time. Let’s get started with the bar chord shapes. The lowest note of each form is the root note of the chord.

Form 1: major
Form 2: major
Form 3: minor
Form 4: minor

Let’s take the C major scale as a starting point. To be able to play any songs in this key you need to know which chords are in this key and how to play them. Chords in a key always follow a functional patttern – meaning that the first chord in a key always does sound similar in relation to the other chords in the key. Those functions are often noted down in roman numerals. The chords in this scale are as follows:

I

C major

ii

D minor

iii

E minor

IV

F major

V

G major

vi

A minor

vii°

B diminished

Since the diminished chord is used not as often let’s leave it out of the picture. That means we have 6 chords that we have to remember for this key. Now choose one of the major bar chords forms and move it so that you are playing a C major chord. Search it now and then look at the solution.

Solution: If you have done it correctly you have used form 1 on the 8th fret or form 2 in the 3rd fret.

Starting from this fret what we are going to do is to look for the shortest way to any other chord. Let’s start with the F major chord. What forms of bar chords could you play and what is the shortest way from each starting point? Again search it for yourself and then look at the solution.

Solution: You could play form 1 on the first fret or you could play Form 2 on the 8th fret. If you started on C major on the 8th fret I’d switch to form 2 on the 8th fret. If you started with the C major chord in fret 3 I’d choose the form 1 in the first fret.

Now repeat his with all other chords that were mentioned above. You can find the solutions below. The left column show the ideal position coming from C major on the 8th fret and the second column show the ideal position coming from the C major on the 3rd fret.

Chord you are changing to

Coming from the 8th fret

Coming from the 3rd fret

ii (D minor)

Form 3 – 10th fret

Form 4 – 5th fret

iii (Eminor)

Form 4 – 7th fret

Form 3 – open

IV (F major)

Form 2 – 8th fret

Form 1 – first fret

V (G major)

Form 2 – 10th fret

Form 1 – 3rd fret

vi (A minor)

Form 3 – 5th fret

Form 4 – open

The trick for this approach lies in noticing the shortest path and practicing to use it.

Once you have internalized this it can be applied to any other key you want to play in. You just have to adjust all the frets by the same amount it takes to move one of the C forms to the tonal center of the new key. That means by practicing to master these 10 chord changes in the key of C you are actually working on mastering chord changes in all (!) keys.

Have fun with this!

About The Author

This article was written by Rene Kerkdyk from Hildesheim’s first guitar school Rock Gitarre Hildesheim. If you are living near Hildesheim and are looking for guitar lessons, give Rene a call!

5 instant fixes to help you with your strumming

strumming guitar lessons kl

5 instant fixes to help you with your strumming

Are you trying the sound of your strumming and it just isn’t sounding right? 

Are you getting frustrated at how it doesn’t feel natural to you when you are strumming? It doesn’t come across as effortless like other guitar players you see? 

Lots of beginner guitar players struggle with their strumming. Whether it’s trying to get their chords to change fast enough, or the strumming technique itself needs improvements. 

Today, we are going to focus on a few things that a lot of beginner guitar players experience in their picking hand (for most people, that would be your right hand, if you are right handed.) And how you can improve your technique, so that your strumming improves too. 

1. Playing all the strings all the time. 

A lot of beginners will play all the strings all the time. Especially when they forget for some chords, you don’t want to play certain strings. 

On top of this, you can improve the melodic sound of your playing by strumming different strings on different beats. 

For example: 

For the first beat of the bar, focus on strumming your bass notes and then for the other beats, strum the higher strings for a more melodic sound. 

Doing this well will instantly make your guitar playing sound more professional. 

If you would like a video example of this: 

2. Not being relaxed enough when strumming. 

When you are strumming, you want to keep yourself nice and relaxed. If you are too stiff, you will end up sounding like a mechanical robot. 

It also makes it much harder for you to play when you are tense. If you want to come across as effortless, the number 1 thing you need to do is relax. 

Just like riding on a bicycle is hard when the wheels are all rusty. So if strumming if you have tension through your shoulders, arms and hand too. 

3. Making sure you’ve got a good angle for your pick 

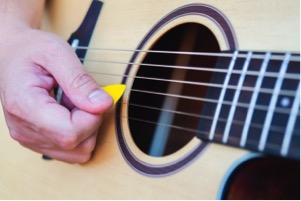
When you first start on the guitar, it’s very common to hold the pick parallel to the strings. 

What you want is to have the pick slightly angled, so that when you strum through the strings. There is less resistance. 

Which brings me onto the next point: 

4. Pick is too deep within the strings themselves 

It’s hard to know in the beginning, what’s the correct way of holding your pick. 

Besides making sure that your pick is at a slight angle when you strum. 

The other way to make sure you have the right amount of resistance when strumming is making sure the pick isn’t too far into the strings. 

If it is, like the pick angle. It creates extra resistance and can pick your strumming sound stiff. 

Make sure your pick is shallow enough that it strums through easily. 

5. Moving your forearm 

 When you strum, keep your wrist loose and move your forearm up and down. Just like a swing. Keep your forearm straight and don’t twist your arm. 

I hope these 5 tips help you to improve your strumming and make your playing seem more effortlessly. Remember playing the guitar isn’t something we were evolved to do, so it does take practice to get it to seem effortlessly. 

Keep persisting and you will get there. 

About author: 

Guitar Tuition East London helps provide beginner guitar lessons in London. Including acoustic and electric guitar players to improve their guitar playing. They make lessons fun and interesting with lots of variety. To help students stay motivated about learning the guitar.